Draw Line Thru Item in Mircosoft Word
 Please Note: This article is written for users of the following Microsoft Word versions: 97, 2000, 2002, and 2003. If you are using a later version (Word 2007 or later), this tip may not work for you. For a version of this tip written specifically for later versions of Word, click here: Vertical Lines in Word.
Vertical Lines in Word
For some documents you may have a need to insert vertical lines. There are actually three or four different ways you can do this in Word. The actual method you choose depends on your document needs and which appeals to you the most. The first method involves using the Drawing toolbar:
- Click on the Drawing tool on the regular toolbar. The Drawing toolbar appears at the bottom of the screen, just above the status bar.
- Click on the line tool on the Drawing toolbar.
- The mouse pointer changes to a cross hair that looks like a large plus sign.
- Click at one end of where you want your line, but don't release the mouse button.
- Drag the mouse to where you want the other end of the line positioned.
- Release the mouse button.
You can continue to draw more lines using this same technique, or you can simply close the drawing toolbar by again clicking on the Drawing tool on the regular toolbar.
The second method involves using bar tab stops. You can see how these appear by following these steps:
- Select the paragraph or paragraphs that you want to contain vertical bars.
- Choose Tabs from the Format menu. Word displays the Tabs dialog box. (See Figure 1.)
- In the Tab Stop Position box enter a horizontal measurement that indicates where you want the bar to appear. Thus, if you want it 2 inches from the left margin, you would enter 2 in the box.
- Click on the Bar radio button.
- Click on Set.
- Repeat steps 3 through 5 to set other bar positions.
- Click on OK when you are done.
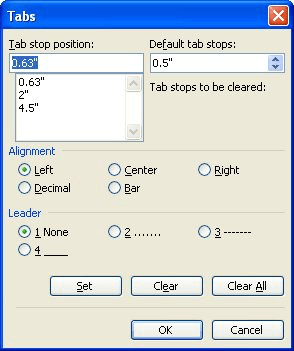
Figure 1. The Tabs dialog box.
If you have multiple columns in your document and you want vertical lines between the columns, you can follow these steps:
- Select the text that you want in columns. (If you don't do this step, then your entire section or document will be formatted into columns.)
- Choose Columns from the Format menu. The Columns dialog box appears. (See Figure 2.)
- Specify the number of columns into which you want the text formatted.
- Make sure the Line Between check box is selected.
- Click on OK.
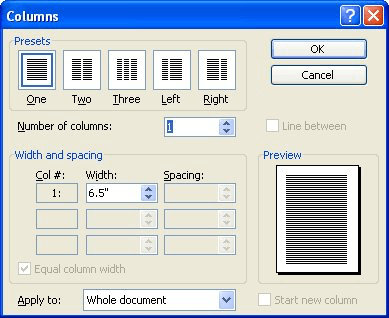
Figure 2. The Columns dialog box.
The final way to create vertical lines is to use tables. While this may seem a bit convoluted, it will work great for small sections of text. To use this method, follow these general steps:
- Create a table that has a single row but as many columns as you want your text divided into.
- Select the table.
- Choose Borders and Shading from the Format menu. The Borders and Shading dialog box appears. (This dialog box is named Table Borders and Shading in Word 6 and Word 95.)
- In the preview section, click the vertical divider in the middle to the layout example.
- Select the line size you want used for the cell divider.
- Click on OK.
- Enter your text in each cell of the table.
WordTips is your source for cost-effective Microsoft Word training. (Microsoft Word is the most popular word processing software in the world.) This tip (1061) applies to Microsoft Word 97, 2000, 2002, and 2003. You can find a version of this tip for the ribbon interface of Word (Word 2007 and later) here: Vertical Lines in Word.
Author Bio
With more than 50 non-fiction books and numerous magazine articles to his credit, Allen Wyatt is an internationally recognized author. He is president of Sharon Parq Associates, a computer and publishing services company. Learn more about Allen...
MORE FROM ALLEN
Sorting an Entire List
Need to sort all the data in a table? Here's the fastest and easiest way to do it.
Discover More
Editing the Windows Registry
The Registry is the central depository of configuration information used by Windows and by programs running on your ...
Discover More
Highlighting Text Using the Keyboard Only
Highlighting text, using the Highlight tool, is a great way to mark up a document. Normally you need to use the toolbar ...
Discover More
More WordTips (menu)
Nudging a Graphic
If you need to move a graphic just a little bit in one direction or another, you can do so by using the techniques in ...
Discover More
Placing Many Graphics in a Document
Word documents can contain more than just text. You can even create documents that contain almost no text at all. This ...
Discover More
Stopping Text from Jumping Around
Do you struggle with getting your graphics and surrounding text to appear just the way you want it? Here are some ...
Discover More
Draw Line Thru Item in Mircosoft Word
Source: https://word.tips.net/T001061_Vertical_Lines_in_Word.html